
How to download blobs from Optimizely (Episerver) DXP environment
Ever wanted to download the blobs from Optimizely DXP environment but don't know how to? In this post I will clarify the process how to download blobs from DXP environment and what tools you need to accomplish it.
As we develop our customer solutions there quite often comes the situation that instead of creating some dummy content we would like to grap for example the latest content and blobs from the DXP production environment and work with that. As you might know the DXP service is built on top of Azure services you might think that you would simply login to the Azure Portal and navigate to the storage resources and get blobs from there, but as this is a service we don't get direct access to the underlying Azure resources via Azure Portal.
Optimizely DXP has a self-service portal which allows us to do deployments, view application logs, copy content between environments and download content from DXP envrionment but this is limited to the database BACPAC file which doesn't include the blobs which we naturally also require. Optimizely DXP documentation has the information on how to get the blobs but that information is spread on multiple pages and no single page howto to exists (at least to my knowledge ;-) so that is the reason for this blog post). Just in case you don't know how to export the database to BACPAC file in DXP and how to get access to the self-service portal.
EDIT 2025-11-30, I've written a new blog post which contains a PowerShell script to do all this with just single command, so if You end up here, you might want to have a look at that.
Download blobs from Optimizely DXP environment
Before you continue to the actual process ensure you have access to DXP self-service portal or a team mate can provide you with an environments API information (project ID, client secret and key).
Rest of the post assumes you have access to the DXP self-service portal and we are settings things up from scratch.
Prerequisities
- EpiCloud PowerShell module installed
- Optimizely EpiCloud module install and other documentation related to it
- AzCopy installed
- Microsoft AzCopy download
- access to DXP self-service to create API credentials
Install EpiCloud PowerShell module
If this is your first time you install any PowerShell modules from PSGallery you should add it as a trusted source to avoid warning when installing modules from there.
- open Windows PowerShell
- check is the PSGallery already added by running command
-
Get-PSRepository
- if you get output listing PSGallery with InstallationPolicy 'Trusted' you can skip the next command to add it as a trusted source
-
- add PSGAllery as trusted source with the following command
-
Set-PSRepository -Name 'PSGallery' -InstallationPolicy Trusted
-
- install EpiCloud module with the following command
-
Install-Module -Name EpiCloud -Scope CurrentUser
- NOTE! The EpiCloud module is not signed so when you use it you need to run the PowerShell session with "powershell.exe -ExecutionPolicy -Bypass" (and note the correct capitalization)
-
- check is the PSGallery already added by running command
Download and install AzCopy
Download the latest version from Microsoft AzCopy page: https://docs.microsoft.com/en-us/azure/storage/common/storage-use-azcopy-v10#download-azcopy
AzCopy is delivered as a zip file and you can extract it anywhere you like. I would suggest that you put it somewhere you have other tools that don't have an installer and you have added that location to your system or user path (in Windows) so that you can easily execute it from anywhere (without using always the full path to the executable).
Create DXP API credential for the environment
- Login to the Optimizely DXP self-service portal
- Select the customer (organization) you want to create the API credential
- Switch to the API tab
- Under the 'Deployment API credentials' click 'Add API Credentials' button
- Give a name for the API Credential
- Select to which environments the API credential can be used to
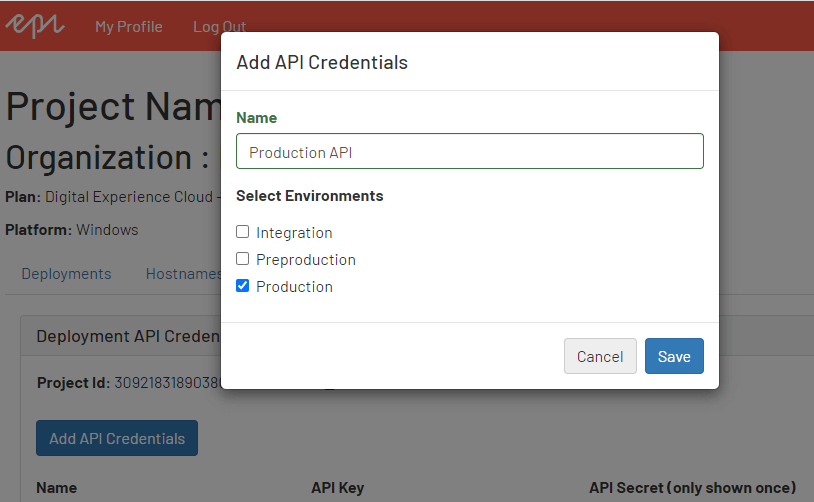
- Click 'Save'
- IMPORTANT! After you have clicked Save, you should copy the 'API Secret' value as this is the only time you can do it! If you forget to copy and store it securely in this step, just create a new API Credential
Download blobs from DXP environment
The following commands assume we have created API Credential for production environment and we will download blobs from production, but the same applies to any other DXP environment as long you use correct environments API Credentials and correct 'Environment name' in cmdlets that require you to define it.
EpiCloud module has these three environment names: Integration, Preproduction and Production
- Open Windows PowerShell
- Start a new PowerShell session that bypasses execution policy (needed because the EpiCloud module is not signed) with the following command (NOTE! you have to use the correct capitalization of ExecutionPolicy and the value Bypass, otherwise the bypass policy is not applied)
-
powershell.exe -ExecutionPolicy Bypass
-
- Set the Optimizely API credential for the session, so that you don't need to pass those as arguments to the EpiCloud module each time with the following command
-
Connect-EpiCloud -ClientKey Your-ClientKey -ClientSecret Your-ClientSecret -ProjectId Your-ProjectId
- ClientKey is the 'API key' value from API Credential
- ClientSecret is the 'API secret' value from API Credential
- ProjectId is the 'Project Id' value from API Credential
- now we have the "authentication" for the API setup and we can use the EpiCloud modules cmdlets
-
- Optional, get the containers for production environment with the following command (not needed if you know the container name):
-
Get-EpiStorageContainer -Environment "Production"
- the command will return you the columns "projectId", "environment" and "storageContainers"
- for example: azure-application-logs, azure-web-logs and name-of-your-blob-container
- the blob container name is naturally the container name you have defined for that environment in your web.config, episerver.framework blob section
- for example: azure-application-logs, azure-web-logs and name-of-your-blob-container
-
- To be able to download the blobs we need a SAS token (Shared Access Signature) for the blob storage container, execute the following command
-
Get-EpiStorageContainerSasLink -Environment "Production" -StorageContainer "your-site-assets-container-name-here" -RetentionHours 1 | Format-Table sasLink -AutoSize -Wrap
- -Environment, one of the EpiCloud environment strings listed in the start
- -StorageContainer, the container name you have defined for the blobs
- -RetentionHours, integer how many hours the SAS token is valid for (use short time)
- Without piping the cmdlet to Format-Table, command would output 5 "columns": projectId, environment, containerName, sasLink and expiresOn
- copy the sasLink value as you will need that as input to the AzCopy command, just be sure when you paste the url for AzCopy that it doesn't contain any extra whitespaces or line feeds
-
- Next step is to download the blobs
- AzCopy will need the path where to download the blobs, so decide the location where you will want to download the blobs
- do note that you don't need to create the "container name" folder in your local path as AzCopy will "replicate" the structure from the storage
- for example, you define local path c:\blobs-from-prod\2021-06-13 (this needs to exist)
- and the container name is 'siteassets', then AzCopy will create that 'siteassets' under the c:\blobs-from-prod\2021-06-13 path
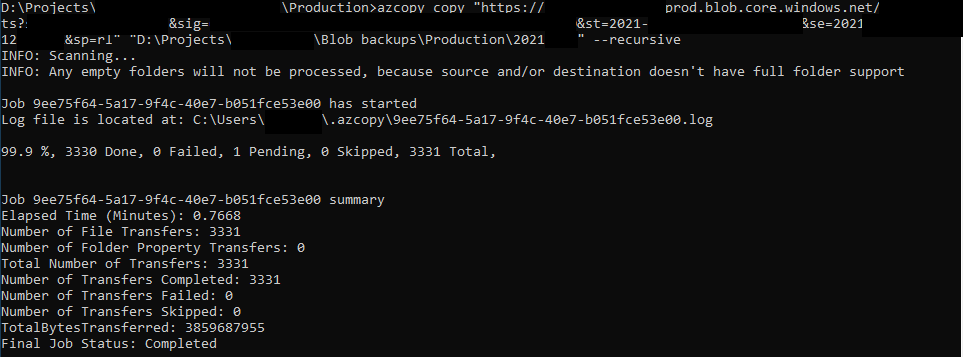
- Execute command to copy the blobs
-
azcopy copy "sasLink value here inside the double quotes" "your destination path inside double quotes" --recursive
- note there are two hyphens before the recursive argument, this means that the blobs are copied recursively under the container (read: all blobs are copied to destination)
- how long does it take? depends on how many blobs there are and how fast your internet connection is
- for example, with 1Gbps connection it took less than a minute to copy 3,6GB (3331 files) =D
-
- AzCopy will need the path where to download the blobs, so decide the location where you will want to download the blobs
Summary
I've covered the tools and steps you need to do, to be able to download blobs from Optimizely DXP environment. Easy & Fast. Hopefully this short "how to" helps you in your projects.
Comments