Creating a global navigation item plug-in, with EPiServer “look and feel”
I needed to create a global navigation item for a plug-in in my current project, beside the Visitor Groups item.
I also wanted my plug-in to have the same look and feel as the other plug-ins/tools in edit/admin-mode. And my third wish, was as always, to implement this with as little effort as possible. I ended up doing the following steps:
1. Create a new Web Form named MyPlugin.aspx in a folder named Plugins.
2. Add the following code to the Web Form. This code will resolve and set the path to the same MasterPage used by EPiServer CMS, which saves us a lot of time, since it already contains all the necessary style sheets and javascripts.
namespace EPiServer.Plugins
{
    public partial class MyPlugin : EPiServer.UI.SystemPageBase
    {
        protected override void OnPreInit(EventArgs e)
        {
            base.OnPreInit(e);

            this.MasterPageFile = EPiServer.UriSupport.ResolveUrlFromUIBySettings("MasterPages/Frameworks/Framework.Master");
        }
    }
}
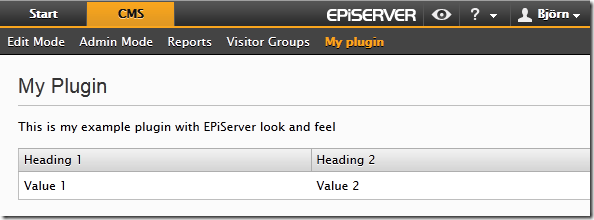
3. Add the following html to the Web Form. We’re using the content placeholder “FullRegion” which is defined in the MasterPage. The ShellMenu control will render the global navigation, and the SelectionPath property must be the same as we will be configuring in the next step. The remaining markup is a sample heading and table with EPiServer CMS style sheets applied.
<%@ Page Language="C#" AutoEventWireup="false" CodeBehind="MyPlugin.aspx.cs" Inherits="EPiServer.Plugins.MyPlugin" %>
<%@ Register TagPrefix="EPiServerShell" Assembly="EPiServer.Shell" Namespace="EPiServer.Shell.Web.UI.WebControls" %>
<asp:Content ContentPlaceHolderID="FullRegion" runat="server">
    <div>
        <EPiServerShell:ShellMenu runat="server" SelectionPath="/global/cms/myplugin" />
    </div>

    <div class="epi-padding">

        <div class="epi-contentContainer epi-fullWidth">

            <div class="epi-contentArea">
                <h1 class="EP-prefix">My Plugin</h1>
                <p>This is my example plugin with EPiServer look and feel</p>
            </div>

            <div class="epi-formArea">
                <table class="epi-default">
                    <tbody>
                        <tr>
                            <th>Heading 1</th>
                            <th>Heading 2</th>
                        </tr>
                        <tr>
                            <td>Value 1</td>
                            <td>Value 2</td>
                        </tr>
                    </tbody>
                </table>
            </div>

        </div>

    </div>
</asp:Content>
4. Configuration, locate the episerver.shell section in web.config, and add the navigation node as follows. This will make the new menu item appear in the global navigation under the CMS tab. The menuPath set here, must be the same as in the previous step, as I said.
<episerver.shell>
  <navigation>
    <add menuItemType="Link" menuPath="/global/cms/myplugin"
      sortIndex="100"
      text="My plugin"
      url="/Plugins/MyPlugin.aspx" />
  </navigation>
  <publicModules rootPath="~/modules/" autoDiscovery="Minimal"/>
  <protectedModules rootPath="~/secure/UI/">
    <add name="Shell"/>
    <add name="CMS"/>
  </protectedModules>
</episerver.shell>
Compile and run your project, a new global menu item is now available, and looks very dandy indeed:
5. Security, protect your plugin from unauthorized users by adding the following nodes to web.config
<location path="Plugins">
  <system.web>
    <authorization>
      <allow roles="WebEditors, WebAdmins, Administrators"/>
      <deny users="*"/>
    </authorization>
  </system.web>
</location>
And there you go!
There is also an existing blog post regarding this, which covers the very basics, and some alternative ways to register your custom menu item.
Happy coding!


Comments