
QuickStart for Epi, Azure AD and WS-Federation
On any project, the concept of identity can be one very hot potato. Who needs to access the system? How do you know who they are? How do you know what they can do? For greenfield sites, you can often use the standard ASP.Net Identity SQL-stored user management to authenticate and authorise users and keep everything within the application itself. However, if you're working with existing sites or larger enterprises, it's highly unlikely that the standard OOTB user management will be enough and you'll probably need to connect to something external.
Ideally, projects that required an external identity management system would use a lovely, rich SSO provider like Auth0 or Okta. Unfortunately, that's not a luxury that we always have available. In the case of corporates, it's highly likely they are still running on-premise Active Directory and authenticating with vanilla LDAP-based AD. In that case, you might find it easiest just to use the OOTB membership provider for Active Directory. If you're running in the Episerver DXC Cloud Service that would really suck though, and a VPN would be needed to tunnel to the on-premise AD (along with all the paperwork that would bring).
This is where both ADFS and Azure AD come in. Before going further, I should probably explain what they both are, what the difference is and where the overlap is. ADFS is a Secure Token Service (STS). This means that it simply a way of serving tokens to identified users. It can't exist on it's own, but uses other systems to authenticate the users against some identity management system (such as Active Directory). Azure AD is an entire identity and access management system (IdAM) that includes a STS. In this sense it's more 'standalone' than ADFS. The difference is therefore that ADFS is a highly flexible STS designed to be customised and backed by full AD, whereas Azure AD is a cloud-based solution that is somewhat more limited on the STS part than ADFS but provides many efficiencies by being a 'one stop shop'.
The commonality between them is that both ADFS and Azure AD support integration via a standard called WS-Federation. This means that using WS-Federation I can request that ADFS/Azure AD authenticates me and issues me a token. From my application's perspective, I don't really care about the IdAM that is 'backing' the STS. I just care that I can ask for a token, something authenticates me and then I get issued a token.
I thought you said it was a QuickStart?
Okay, I'll get to some steps now. I just needed to cover the intro so we understood what we were doing and why! In this QuickStart, I'm going to use Azure AD as my STS. As stated before, the approach to ADFS and Azure AD is nearly identical as far as my application is concerned because the bit we talk to is just a WS-Federation compliant STS, however by using Azure AD it's going to be much easier (and cheaper!) to set up. Setting up ADFS is rather tedious (you require Active Directory domain controllers, ADFS servers, ADFS Web Application or 'WAP' servers and a pile of configuration) and I wouldn't go there unless you need to.
To start, let's set up our Episerver site. Simply create an Alloy MVC site using Episerver's Visual Studio extension. It's a good idea to spin it up and create a username and password, just in case you need to troubleshoot later. If you open up the code then you'll find that Startup.cs contains code to talk to the built-in user and role managers. We'll replace those later.
Setting up Azure AD
Now we need to set up our Azure AD. Log onto the Azure Portal and select the 'Azure Active Directory' option on the left-hand navigation. You should have one already provisioned, even if you're logging in with a Hotmail account or similar. In that case, it will be an Azure AD with just you in it. In order to be able to integrate with Azure AD, we need to create an application. This is effectively the 'vehicle' that we use to communicate with the STS and obtain tokens. To create this, do the following:
- Select 'Application Registrations'
- Select 'New Application Registration' (at the top)
- Give the new application a Name and for the Sign-on URL, use the URL of your new Episerver site (e.g. http://localhost:59574/) - leave the application type as Web app / API
- Click 'Create'
By this point you should have a screen that looks something like this:
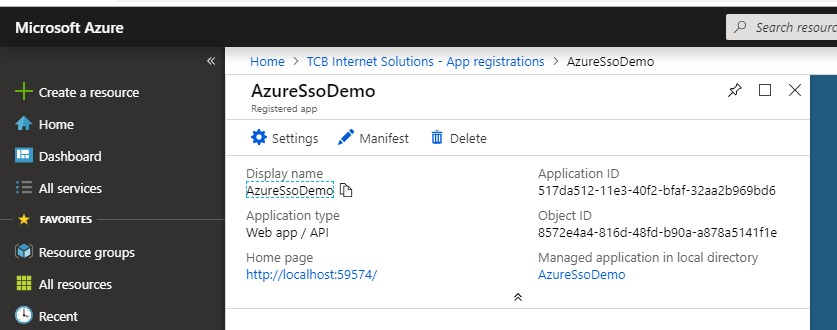
Our application is now created, but we need to configure a few settings on it. Click the 'Settings' option and set the following:
- Properties -> App ID URL -> [set this to the URL of your site, e.g. http://localhost:59574/]
- Reply URLs -> [add one for your episerver CMS login, e.g. http://localhost:59574/episerver/cms]
- Required Permissions -> (Add) -> Select an API -> [select 'Microsoft Graph' then choose the two permissions: 'Read all users full profiles', 'Read directory data']
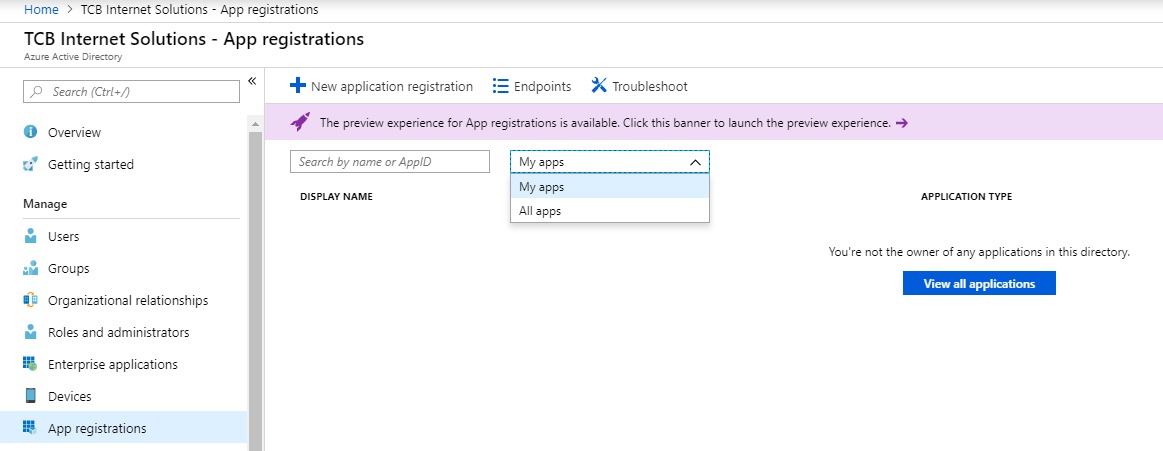
Quick gotcha... if you've left the screens and go back to 'App registrations' you probably won't see the app you created. That's because you need to change the filter from 'my apps' to 'all apps':
Of the three settings we just changed, the third one (permissions) isn't actually necessary for authentication. We can log on users fine without it. But if we want to authorise them to do things, like log on to Edit mode, then we need to assign them to roles. For this, we need to allow access for the application to be able to read roles from Azure AD. There are two kinds of role we could read: Azure AD groups or Role Based Access Control (RBAC). The first is the more traditional AD-like groups. However, I've found it much harder to get these as role claims through to our website. The permissions and mechanisms for pulling Azure AD groups through as applications roles are not trivial. The simpler option is to use RBAC. In this case, the roles are held within the application itself. Permissions and mechanism becomes much simpler. Let's set up a RBAC group for 'WebAdmins' and add our user to it now.
- Open your application in App Registrations (if it's not open aready)
- Select 'Manifest'
- In the displayed JSON file, find the 'appRoles' element (near the start) and replace it with the following - note that you can create your own GUID if you prefer and make sure that there is a comma at the end before the next item in the JSON file!
"appRoles": [ { "allowedMemberTypes": [ "User" ], "displayName": "WebAdmins", "id": "814a5ee4-b1a1-44f7-b509-23e1889ec119", "isEnabled": true, "description": "Web Adminstrators.", "value": "WebAdmins" } ] - Save the manifest
- Go to Azure Active Directory -> Enterprise Applications -> [your application] -> Users and Groups
- Select 'Add user'
- Choose one or more users that you want to use to log in as a web admin
- Choose the WebAdmins role (if this is the only role, it will be preselected and greyed out - that's okay)
- Click 'Assign'
We have now added the user(s) into that RBAC group, and when they log on, they will get the role claim sent to your website to be used as an Episerver role. We're nearly there on the Azure AD side of things, there is just one more security check we need to do. The permissions we added require an administrator to confirm them:
- Open your application in Enterprise Applications (if it's not open aready)
- Click 'Permissions'
- Click the button called 'Grant admin consent for ...' with the name of your organisation
- You will be prompted for an admin user login, login and Accept the permissions request
The last thing we want to do is get our Azure AD endpoint as we'll be using this just now. You can find this here:
- Azure Active Directory -> App registrations -> Endpoints -> Federation Metadata Document
Setting up the website
Now we are ready to flip the code over in our website to use Azure AD. To to the project in Visual Studio and do the following:
- Add the nuget package Microsoft.Owin.Security.WsFederation
- Comment out the contents of the Configuration method of the Startup.cs file and paste the following there instead, replacing the two settings in square brackets as needed (with thanks to articles from Episerver World and the Episerver Forums on which code this is based):
app.SetDefaultSignInAsAuthenticationType(CookieAuthenticationDefaults.AuthenticationType); app.UseCookieAuthentication(new CookieAuthenticationOptions()); app.UseWsFederationAuthentication( new WsFederationAuthenticationOptions { MetadataAddress = "[your Azure AD metadata endpoint]", Wtrealm = "[your site URL, e.g. http://localhost:59574/]", Notifications = new WsFederationAuthenticationNotifications() { RedirectToIdentityProvider = (ctx) => { if (ctx.OwinContext.Response.StatusCode == 401 && ctx.OwinContext.Authentication.User.Identity.IsAuthenticated) { ctx.OwinContext.Response.StatusCode = 403; ctx.HandleResponse(); } ctx.ProtocolMessage.Wreply = SiteDefinition.Current.SiteUrl.ToString(); return Task.FromResult(0); }, SecurityTokenValidated = (ctx) => { var redirectUri = new Uri(ctx.AuthenticationTicket.Properties.RedirectUri, UriKind.RelativeOrAbsolute); if (redirectUri.IsAbsoluteUri) { ctx.AuthenticationTicket.Properties.RedirectUri = redirectUri.PathAndQuery; } ServiceLocator.Current.GetInstance<ISynchronizingUserService>().SynchronizeAsync(ctx.AuthenticationTicket.Identity); return Task.FromResult(0); }, AuthenticationFailed = (ctx) => { throw new Exception(ctx.Exception.ToString()); } } }); app.UseStageMarker(PipelineStage.Authenticate); app.Map("/util/logout.aspx", map => { map.Run(ctx => { ctx.Authentication.SignOut(); return Task.FromResult(0); }); }); AntiForgeryConfig.UniqueClaimTypeIdentifier = ClaimTypes.Name; - Resolve any references as needed
- Build and run the project
It's that easy! When you now go to your site /episerver/cms, you should get taken to Azure AD for authentication, something like this:
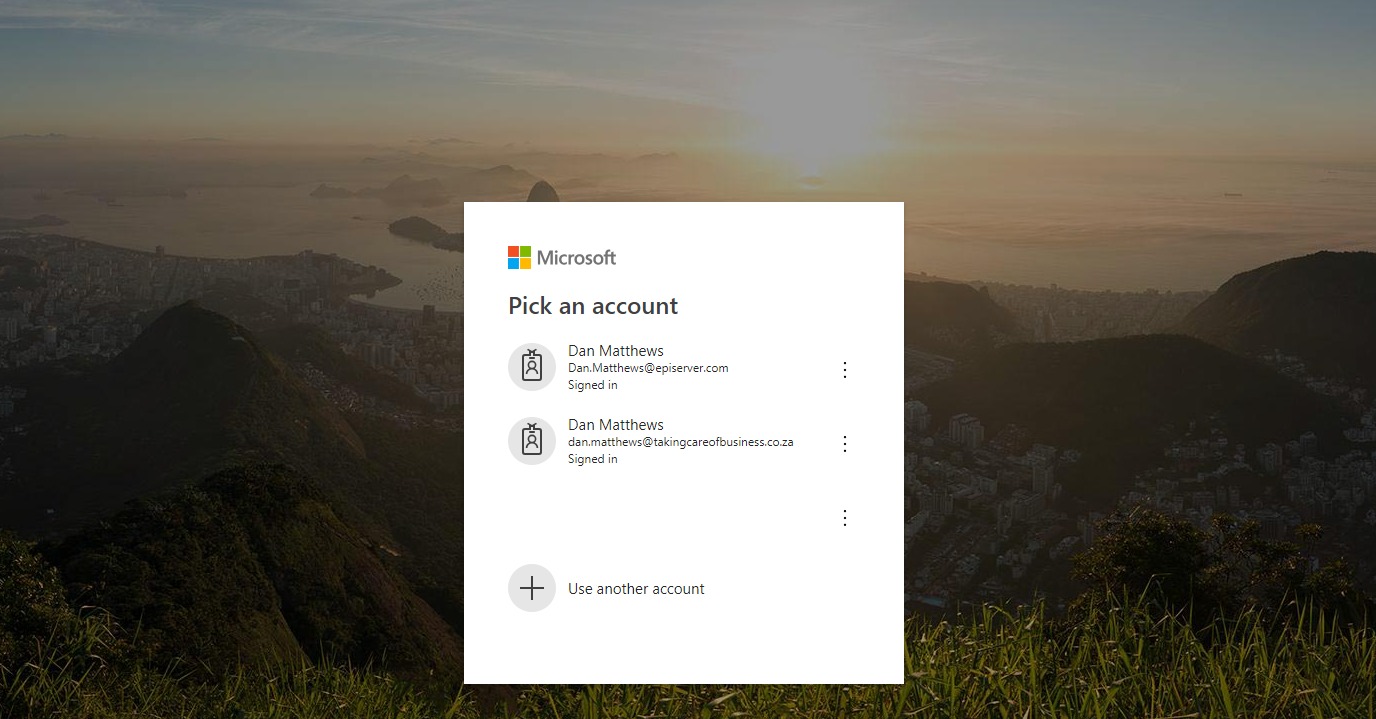
Pick your account that you assigned the WebAdmins group to, and you should be able to get into the Episerver CMS edit mode successfully!
Conclusion
In this QuickStart we walked through setting up a new application in Azure AD, configuring it and then switching our Alloy site to use that application configuration and authenticate to Azure AD. The setup you've gone through here supports SSL and multi-site, both of which you can set up on IIS Express (maybe the subject of another post?!).
I hope this helps you get started using WS-Federation and Episerver. Some of the screens and things may change over time, so I don't know how long this QuickStart will be perfectly valid, but the concepts inside should be around for some time to come.
Comments