
Installing WebApi and enable dependency injection for it
Update: I have updated the code to do as Valdis are pointing out in the comments.
It is more and more common to use WebApi inside a Episerver solution, since it is great to use when you for example like to extend the editor interface or do some ajax request on the site.
Installing WebApi is very straight forward but sadly not to enable Structure Map to handle dependency injection on it and you should of course use dependency injection also on your api controllers like you do in all your MVC controllers (I hope).
I am just nu preparing a session on how to extend the editorial interface that I will hold on Ascend in both Stockholm and London and in that solution, I am using webapi with dependency injection so I thought I would share on how I do in that solution to make it all work. First to say is that this solution is based on Episerver 10 that are not released yet but it should work/act the same on Episerver 9.
Installing WebApi
Like with everything else this is done with nuget package. Install the package Microsoft.AspNet.WebApi and it will install all other stuff you will need as well.
When I run the project the first time after installing this I got this error: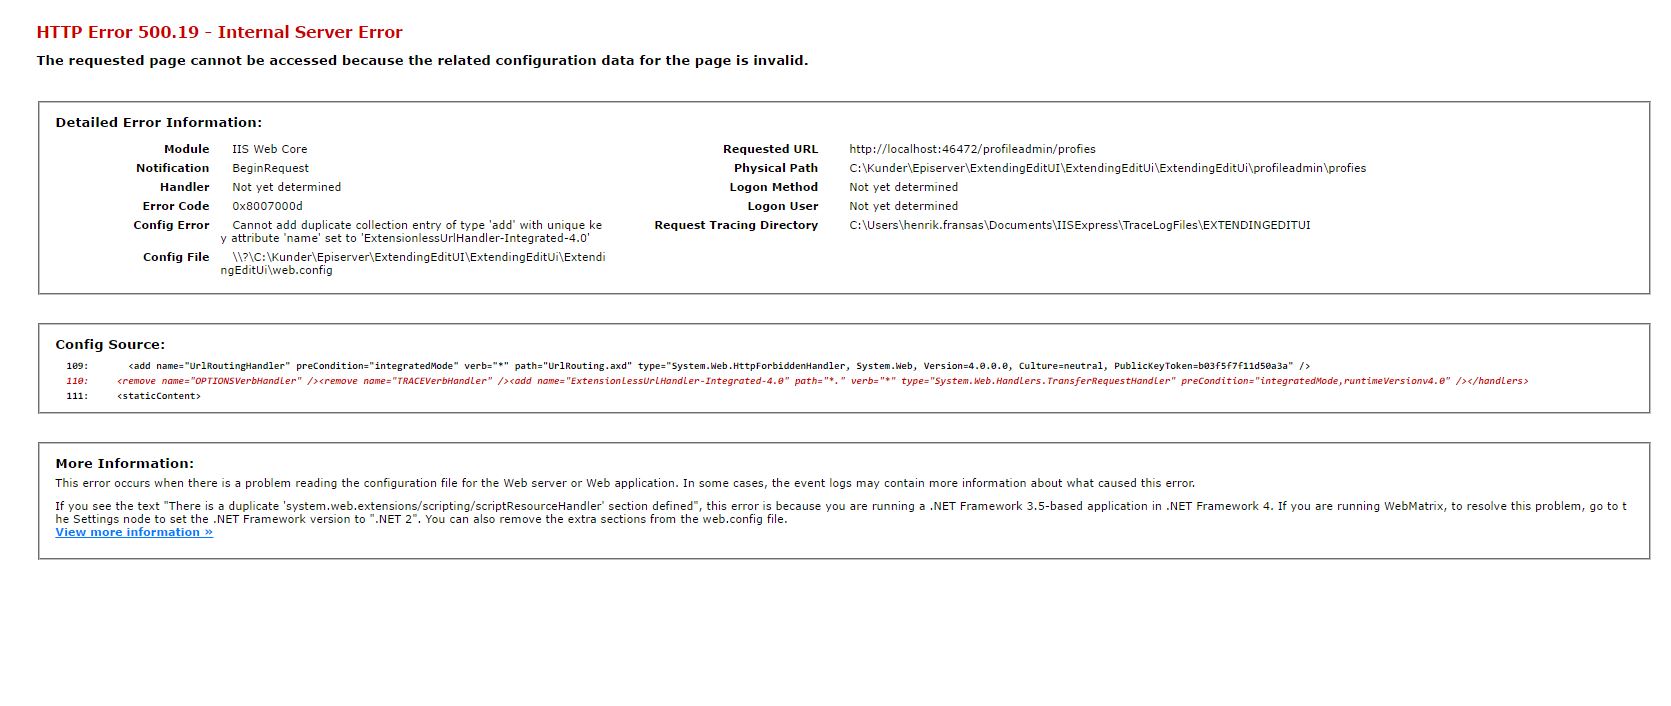
The problem was that for some reason the installer had added the http-handler ExtensionlessUrlHandler-Integrated-4.0 even that it already existed in my web.config.
The only difference between them was that one had verb="*" and the other one verb="GET,HEAD,POST,DEBUG,PUT,DELETE,PATCH,OPTIONS" and since the last one seem to include all that I know about, I kept the one with * verb and removed the other one.
This might not happen in your solution since it depends on what you have installed before installing this.
Enable dependency injection
I base this session on a Alloy site so this is how to do it in Alloy and it might not be the same for you since it depends a lot on how you have set up Structure Map in your project but it can be a standpoint to take inspiration from.
1: Then you create a new class that I call StructureMapScope and that class should implement IDependencyScope. For me it looks like this:
public class StructureMapScope : IDependencyScope
    {
        private readonly IContainer container;

        public StructureMapScope(IContainer container)
        {
            if (container == null) throw new ArgumentNullException("container cannot be null");
            this.container = container;
        }

        public object GetService(Type serviceType)
        {
            if (serviceType == null) return null;
            if (serviceType.IsAbstract || serviceType.IsInterface) return container.TryGetInstance(serviceType);

            return container.GetInstance(serviceType);
        }

        public IEnumerable<object> GetServices(Type serviceType)
        {
            return container.GetAllInstances(serviceType).Cast<object>();
        }

        public void Dispose()
        {
            this._container.Dispose();
            GC.SuppressFinalize(this);
        }
    }
2: Then you have another class in Alloy that are called StructureMapDependencyResolver. Change that class so it also implement System.Web.Http.Dependencies.IDependencyResolver, making its definition look like this:
public class StructureMapDependencyResolver : IDependencyResolver, System.Web.Http.Dependencies.IDependencyResolver3: After doing that you need to also implement a couple of new functions and they should look like this:
#region Http IDependencyResolver

        public IDependencyScope BeginScope()
        {
            var childContainer = _container.GetNestedContainer();
            return new StructureMapScope(childContainer);
        }

        public void Dispose()
        {
            _container.Dispose();
        }

#endregion
4: After that you need to call this new class and add it to the global configuration, you can do that in the file DependencyResolverInitialization. In my solution that file looks like this:
[InitializableModule]
    [ModuleDependency(typeof(EPiServer.Web.InitializationModule))]
    public class DependencyResolverInitialization : IConfigurableModule
    {
        public void ConfigureContainer(ServiceConfigurationContext context)
        {
            context.Container.Configure(ConfigureContainer);
            var resolver = new StructureMapDependencyResolver(context.Container);

            DependencyResolver.SetResolver(resolver);
            GlobalConfiguration.Configuration.DependencyResolver = resolver;
        }

        private static void ConfigureContainer(ConfigurationExpression container)
        {
            //Swap out the default ContentRenderer for our custom
            container.For<IContentRenderer>().Use<ErrorHandlingContentRenderer>();
            container.For<ContentAreaRenderer>().Use<AlloyContentAreaRenderer>();

            //Example on how to add scanning on your own code
            container.Scan(c =>
            {
                c.AssemblyContainingType<IUserProfileRepository>();
                c.WithDefaultConventions();
            });
        }

        public void Initialize(InitializationEngine context)
        {
        }

        public void Uninitialize(InitializationEngine context)
        {
        }

        public void Preload(string[] parameters)
        {
        }
    }
After all this is done you can safely start to use dependency injection also in you api controllers!
Happy coding!
Comments