
Creating a component that searches for content
Update: you can download a 7.5 compatible version here: SearchComponentSourceCode.zip
In the third blog post in the series how to extend the user interface in EPiServer 7 we’ll look into how to create a more complex component. The goal in this case is to use some of the built in classes in EPiServer 7 to provide the user with a search box which will call the server to issue a page search and then present this to the user. Since we’ll use a built in class in EPiServer CMS to display the items which will give us automatic support for content type icon, click to go to the item as well as drag and drop support, for instance to a content area, for the items.
First, we add the component that will automatically plug in to the user interface.
[Component(
Categories = "cms",
WidgetType = "alloy.components.CustomSearch",
//Define language path to translate Title/Description.
//LanguagePath = "/episerver/cms/components/tasks";
Title = "Custom Search",
Description = "Test of custom search",
SortOrder = 120,
PlugInAreas = PlugInArea.AssetsPanel
)]
public class CustomSearch
{ }
Then we will add the client widget needed to display our component. Since we have previously added a namespace mapping from alloy => ClientResources/Scripts we add a file named ClientResources/Scripts/components/CustomSearch.js with the following content:
define([
// Dojo
"dojo",
"dojo/_base/declare",
"dojo/dom-geometry",
// Dijit
"dijit/_TemplatedMixin",
"dijit/_Container",
"dijit/layout/_LayoutWidget",
"dijit/_WidgetsInTemplateMixin",
// EPi CMS
"epi/cms/component/ContentQueryGrid",
"dojo/text!./templates/CustomSearch.html"
], function (
// Dojo
dojo,
declare,
domGeometry,
// Dijit
_TemplatedMixin,
_Container,
_LayoutWidget,
_WidgetsInTemplateMixin,
// EPi CMS
ContentQueryGrid,
template
) {
return declare("app.components.CustomSearch",
[_Container, _LayoutWidget, _TemplatedMixin, _WidgetsInTemplateMixin], {
// summary: This component enabled searching of content where the results will be displayed in a grid.
templateString: template,
postCreate: function () {
this.inherited(arguments);
},
resize: function (newSize) {
// summary:
// Customize the default resize method.
// newSize: object
// The new size of the custom query component.
// tags:
// Public
this.inherited(arguments);
var toolbarSize = domGeometry.getMarginBox(this.toolbar);
var gridSize = { w: newSize.w, h: newSize.h - toolbarSize.h }
this.contentQuery.resize(gridSize);
},
_reloadQuery: function () {
this.contentQuery.set("queryParameters", { queryText: this.queryText.value });
this.contentQuery.set("queryName", "CustomQuery");
}
});
});
Creating a template for the widget
One thing to mention is the following row in our define statement:
"dojo/text!./templates/CustomSearch.html"
What this does it telling the system that we want to load a text resource with the name/path “./templates/CustomSearch.html”. Dojo gives us the option to set up our child widgets programmatically as well as defining them in a text string which can either be declared as a string property or placed in an html file. In this case we create a file named “CustomSearch.html” and place it in a folder named “templates” located in the same folder as the editor. Inside the template we add the following markup:
<div>
<div class="epi-gadgetInnerToolbar" data-dojo-attach-point="toolbar">
<div data-dojo-type="dijit.form.TextBox"
data-dojo-attach-point="queryText"
data-dojo-props="intermediateChanges:true"
data-dojo-attach-event="onChange: _reloadQuery">
</div>
</div>
<div data-dojo-type="epi.cms.component.ContentQueryGrid" data-dojo-attach-point="contentQuery">
</div>
</div>
If you take a look on the html in the template you can see some standard html stuff like elements and standard attributes like “class”. There are, however, also some html5-data-attributes defined which dojo will use when starting instances of the widget to simplify working with the nodes in the template. In this case we have used:
- data-dojo-type: Converts the regular html element to a widget with the type specified in the attribute, for instance "dijit.form.TextBox".
- data.dojo.attach-point: Makes it possible to access the node from within our widget with the given value, for instance ”toolbar”.
- data-dojo-props: Adds properties defined in the attribute to the widget at start up. In this case we set the intermediateChanges property of the textbox to true.
- data-dojo.attach-events: Connects an event of the widget to a method in our widget. In our case we attach to the onChange event of the textbox and our widgets method “_reloadQuery”.
Using ContentQueryGrid to display the results
Last in the template we add a widget with the type "epi.cms.component.ContentQueryGrid". This is a class in EPiServer CMS that is used to display listings of content to the user. This class depends on that a query that returns a list of content have been plugged into the server. We’ll add this shortly but let’s look on the parameters passed on to get the correct query and parameters. We implemented a method called _reloadQuery in our widget that will be called each time someone changes the textbox:
_reloadQuery: function () {
this.contentQuery.set("queryParameters", { queryText: this.queryText.value });
this.contentQuery.set("queryName", "CustomQuery");
}
What this code does is two things:
- It adds any custom parameters that we need to the query, in this case queryText.
- It sets the queryName property of the ContentQueryGrid to “CustomQuery” which will be used to find the query to execute.
Implementing the server side query
So far, we have added the definition of the component and the client side widget including the template for the widget. The only thing we have left is to implement the actual search query that will be executed:
using System.Collections.Generic;
using System.Linq;
using System.Web;
using EPiServer.Cms.Shell.UI.Rest.ContentQuery;
using EPiServer.Core;
using EPiServer.ServiceLocation;
using EPiServer.Shell.Search;
namespace EPiServer.Templates.Alloy.UIExtensions.CustomSearch
{
[ServiceConfiguration(typeof(IContentQuery))]
public class CustomSearchQuery : ContentQueryBase
{
private readonly IContentRepository _contentRepository;
private readonly SearchProvidersManager _searchProvidersManager;
private readonly LanguageSelectorFactory _languageSelectorFactory;
public CustomSearchQuery(
IContentQueryHelper queryHelper,
IContentRepository contentRepository,
SearchProvidersManager searchProvidersManager,
LanguageSelectorFactory languageSelectorFactory)
: base(queryHelper)
{
_contentRepository = contentRepository;
_searchProvidersManager = searchProvidersManager;
_languageSelectorFactory = languageSelectorFactory;
}
/// <summary>
/// The key to trigger this query.
/// </summary>
public override string Name
{
get { return "CustomQuery"; }
}
protected override IEnumerable<IContent> GetContent(ContentQueryParameters parameters)
{
var queryText = HttpUtility.HtmlDecode(parameters.AllParameters["queryText"]);
var searchQuery = new Query(queryText);
var contentReferences = Enumerable.Empty<ContentReference>();
var searchProvider = _searchProvidersManager.GetEnabledProvidersByPriority("CMS/Pages", true)
.FirstOrDefault();
if (searchProvider != null)
{
contentReferences =
searchProvider.Search(searchQuery).Select(
result => ContentReference.Parse(result.Metadata["Id"])).Distinct();
}
return _contentRepository.GetItems(contentReferences,
_languageSelectorFactory.AutoDetect(parameters.AllLanguages));
}
}
}
The search class is pretty straight forward but a few things to mention is:
- It uses the ServiceConfiguration attribute to plug in as a query to the content structure store which is one of the default REST stores in EPiServer CMS.
- It inherits from ContentQueryBase
- which is a base query implementation that handles some things like access rights filtering.
- It overrides the GetContent method which does the actual search and return an IEnumerable of IContent.
That was the last thing we needed to do so lets compile and load up the user interface. We now have a component in the asserts pane. When we enter text in the textbox we issue an query and show the items the EPiServer-way:
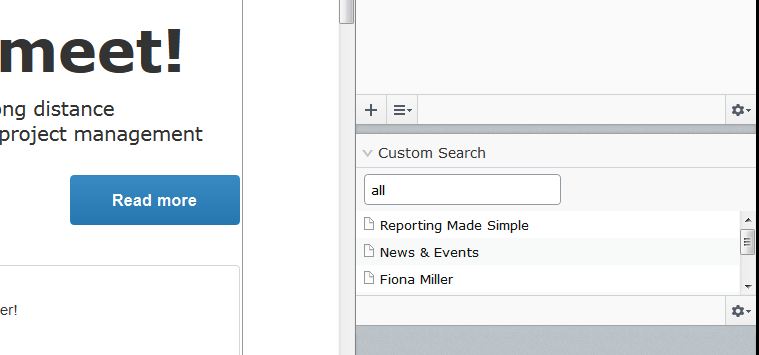
Note: If you have installed the new Alloy template package and try to run this you will probably not get any hits as you type. The reason for this is that the Alloy templates has configuration transforms enabled but unfortunately the configuration for episerver.search is added to the regular web.config file. To remedy this you can install search again on your site and move the search configuration from the regular web.config file to the web.config file placed in [configuration]/EPiServer.
This blog post is part of a series to extend the user interface in EPiServer 7.
Extending the User Interface of EPiServer 7
Plugging in a Dojo based component
Creating a content search component
Adding a more advanced property editor
Comments