
Avoid Nesting Blocks – Flatten Into a Single Content Area
Blocks inside blocks is an easy way to structure data in the CMS that depends on other data. Easy for us developers that is, it only takes two or three levels of nesting before it becomes difficult for editors to work with and all the stepping in and out of blocks will quickly make them forget where in the structure they are and they feel lost.
After taking a quick look at what the CMS offers today to make this easier I will show a solution we have come up with that puts everything in one content area to give a easy overview while at the same time keeping the nested relationship clear.
What the CMS offers
Here are three features offered by Optimizely CMS that can be used to make it easier to work with nested content, but in the end is it still nested blocks.
Block properties
Oldest of the three features is the ability to use block types as properties on other content types. This type of properties render the properties of a block like they are a part of the content type the property is in. While more often used by developers to avoid repeating themselves, block properties are like an alternative to using a content reference to a block.
Quick edit
Quick edit helps to reduce the confusion of nesting blocks by making it possible to edit blocks in a content area inside a pop-up. (Added in CMS UI 11.32.0, released in January 2021)
List properties
List properties are not new but in 12.18.0 (released in March 2023) it got a big update. You can now add a list of blocks to a content type and edit them all as a part of the page. If you have not seen this feature yet it's like a content area but it's content is rendered like block properties. It's a very nice feature, but not ideal for nesting. When I experimented with this feature a couple of months ago I placed a block list property inside a block I used as a block list property and quickly found myself unsure of what outer block I was adding inner blocks to and scrolling a lot up and down in the editing interface. I also encountered and reported a bug that caused problems with saving when editing inner blocks in this kind of setup.
What we built
The built in features listed above have their use cases and limitations, for example can you not reuse block- and list-properties. We have come up with a design where we flatten a three level structure into a single content area using special purpose blocks. We use this technique on pages with a flexible design where the page is rendered with one or more sections, sections containing one or more columns and all blocks fall into one of the columns.
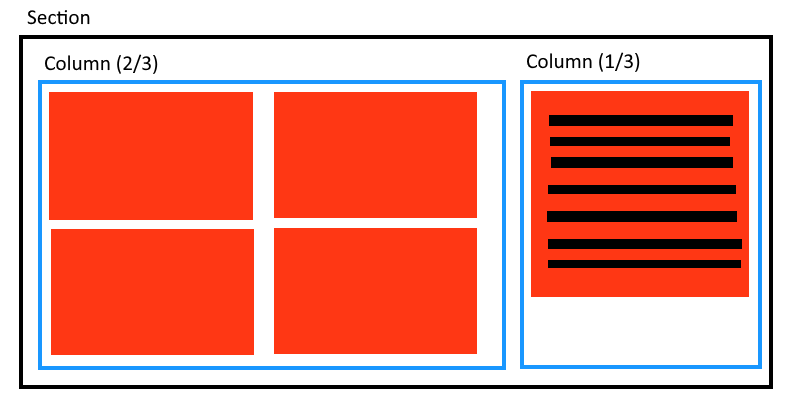
Take a look at the image below showing a drawing how one of our customers use this system. A section of a page with two columns, the first with a width of 2/3 and the second 1/3. The wider column has four big links to popular information pages and the smaller column have smaller has a single block with links to various sections and services on the site.
Many sites probably implements this by adding a content area to section blocks for column blocks and a content area in column blocks for other blocks. The content area on this page looks like this:
-
Section block
-
Column block (2/3)
-
Information page 1
-
Information page 2
-
Information page 3
-
Information page 4
-
Column block (1/3)
-
Quick links block
This puts everything in-front of the editors, no need to step in and out of blocks to find where a certain block is located and moving blocks between columns or sections is as easy as reordering them inside the content area.
When it's time to render the page we have a method that loads the content area items and puts blocks inside their column and columns inside their section. In our case we deliver JSON to our frontend and the agreed contract says it's a three level structure. If you render in razor views or something else you will probably find that converting from a flat structure to a three level one at some point will make the rendering easier.
However, even this solution has it's drawbacks. I have seen a page on the previously mentioned site with a content area that has a height greater than two times of my monitor. If an editor is looking for, say, the 5th block in the 1st column of the 4th section they have to slowly scan the content area to locate the start of the 4th section and then count to the 6th block. (1 column block and then another 5 blocks.)
When we began building a new site a couple of months ago I decided to look into how to make large content areas easier to overlook and found that styling content area items to be easy and effective. In the image below it's with a quick glance clear what is a section, a column or another kind of block. Looking for the beginning of the nth section? Just count the darker colored blocks.
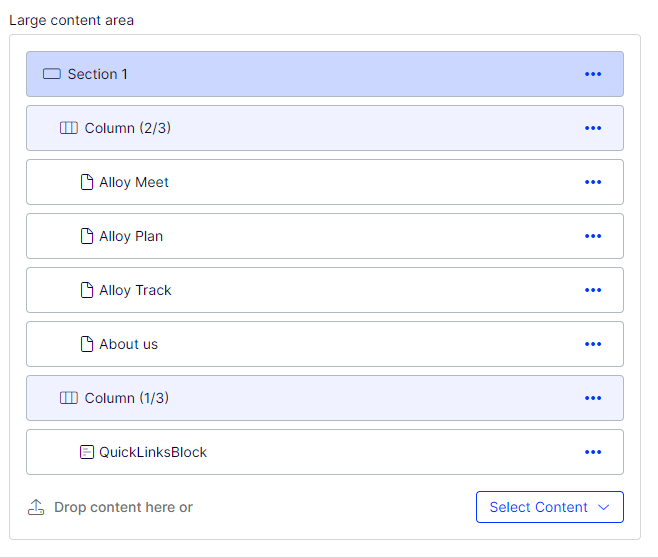
After the section in the image you could for example add one with a single full-width column and after that a section with two half-width.
Implementation
To create the effect above you need to do four things.
-
Define the content types, in our scenario for section and column blocks
-
Assign an IconClass to section and column blocks using UI descriptors.
-
Write CSS rules targeting content area items with the specific icon classes.
-
Register the CSS file for Optimizely to load when an editor is working in the CMS, if the project does not already have one, and add the CSS rules to said file.
Defining section and column blocks
These are two very basic type of blocks and don’t need a lot of properties. Sections could have a background color option and columns need a width selection. We use content events to automatically add a columns selected width to it’s name to show editors the most important information without they having to step into (or quick edit) the block.
Adding icon classes
Adding icons to content types makes them easier to distinguish from each other and is one of the few ways to add developer-controlled data to the html of content area properties in the CMS. Icons are added using UIDescriptors:
using EpiServer.Shell;
using MySite.Blocks;

namespace MySite.Business.UIDescriptors;

[UIDescriptorRegistration]
public class SectionUIDescriptor : UIDescriptor<SectionBlock>
{
    public SectionUIDescriptor() : base("content-icon-section")
    {}
}

// Repeat for ColumnBlock
Creating CSS rules
The CSS used to create what you saw in the image above can be seen below. The screenshot was taken on a site running Episerver.CMS 12.24 and has not been tested on early 12.x or prior mayor versions.
/* <projectRoot>/wwwroot/Styles/editmode.css */

/* Give the special marker blocks (section and column) a custom background in content areas */

span:has(.content-icon-section) {
    background-color: #ccd7ff!important;
}

span:has(.content-icon-column) {
    background-color: #f0f3ff!important
}

/* Make it look like columns are a level below sections and all other blocks are a level below columns (in content areas) */

.epi-content-area-editor .dijitIcon.dijitTreeIcon.dijitLeaf.epi-objectIcon {
    margin-left: 34px;
}

.epi-content-area-editor .dijitIcon.dijitTreeIcon.dijitLeaf.content-icon-section.epi-objectIcon {
    margin-left: 0px;
}

.epi-content-area-editor .dijitIcon.dijitTreeIcon.dijitLeaf.content-icon-column.epi-objectIcon {
    margin-left: 17px;
}

/* Custom content icons (appearing to the left in the page tree, assets pane, content area items) */
/* Optimizely uses 'Font Awesome 6 Pro' for some of their icons, no need to add that font explicitly */

.content-icon-section::before {
    padding-right: 5px;
    content: "\f2fc";
    font-family: 'Font Awesome 6 Pro';
}

.content-icon-column::before {
    padding-right: 5px;
    content: "\e361";
    font-family: 'Font Awesome 6 Pro';
}
Registering a CSS file
To tell Optimizely CMS that we have a CSS file we want to be loaded by the CMS we have to register it in module.config.
<?xml version="1.0" encoding="utf-8" ?>
<!-- <projectRoot>/module.config -->
<module>
    <clientResources>
        <add name="epi-cms.widgets.base" path="/Styles/editmode.css" resourceType="Style"/>
    </clientResources>
</module>
Finishing up
As I quickly mentioned in the section “Adding Icon classes” are content areas rather restricted. They are powerful and can do a lot, but the implementation is classified as internal and difficult to extend without resorting to ugly or hacky solutions that could break at any time without notice. Thanks to the icons we got something easily added to target in CSS and because both the coloring and the icons depends on the content type it's perfect for this scenario. I was worried that the coloring or indendation would appear in the assets pane or page tree but that was not a problem. The icon is applied everywhere but the CSS earlier only sets background color and indentation for items in content areas.
Have you ever felt lost in heavily nested blocks? Have you tried searching for a solution? If you know of another interesting way to solve this problem please share it in the comments.
Someone has pointed out that compared to nested blocks you can not quickly change order of columns or sections, you have to move one block at a time. I have begun looking into it a little and if I find something interesting then maybe I will write a blog post about it.
Comments