
Using AI to analyze Images in Episerver
Inspired by Artificial Intelligence? Me too!
In this blog, I'll show you how to configure Azure Cognitive Services, add the Computer Vision C# SDK to Episerver, and work with Azure Computer Vision's APIs to analyze Images.
What can we do with AI in the CMS
After reading the official documentation I had several cool ideas;
- By using the Describing images feature we can generate a human-readable description of the image (eg alt text) to improve Accessibility and SEO.
- We could detect and prevent inappropriate content by using the Adult and Racy images feature. Imagine validating User Generated Content, or auditing an entire Media Library with a scheduled task.
- In line with the inappropriate visual content, we can use the Recognize Text feature to read embedded text, then validate it against a list of banned words.
- We could automatically set the focal point and crop images by using the Thumbnails and Area of Interest feature. I think this one is really cool. You've likely seen tools that allow CMS Editors to select a focal point for an image, we can now use AI to set it.
- We can use the Color schemes feature to allow us to automatically select a theme to complement the Image's colors (eg a light or dark theme of a hero Banner).
For the remainder of this blog, I will demonstrate the first idea, generating descriptive text for an image.
Configuring Azure Cognitive Services Computer Vision
You will need an Azure account to perform this step.
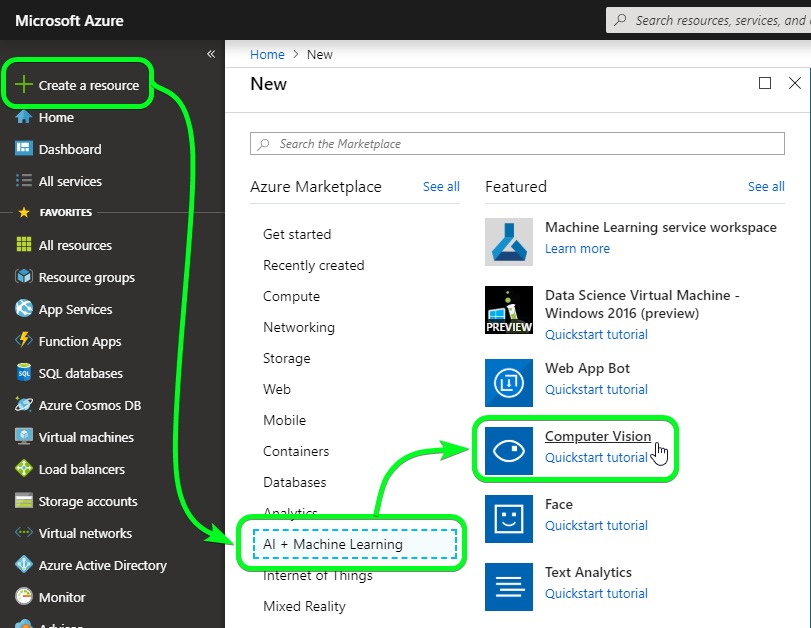
In your Azure Portal, click Create a resource > AI + Machine Learning > Computer Vision (or search for Computer Vision).
Then complete the form
- Enter a Name (eg ComputerVision)
- Select your Subscription
- Select a Location (remember it, you'll need it later)
- Select a Pricing Tier (the F0 free tier is fine)
- Select or Create a Resource Group (eg Episerver)
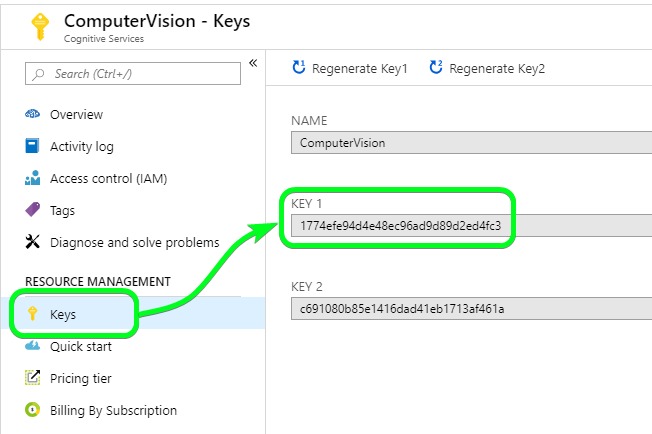
Finally, after Azure has provisioned the service, you'll need to copy Key 1 (actually either key will work) to use in your code (yes I have reset my keys, sorry!).
A quick test using Postman
At this point the AI Service is running in Azure, it's a good time to quickly confirm things are working. Using Postman I made a POST using the API. This is the Image URL I sent to the service, and this the JSON result.
{
  "categories": [
    {
      "name": "outdoor_oceanbeach",
      "score": 0.99609375,
      "detail": {
        "landmarks": []
      }
    }
  ],
  "adult": {
    "isAdultContent": false,
    "isRacyContent": false,
    "adultScore": 0.011389658786356449,
    "racyScore": 0.030652720481157303
  },
  "color": {
    "dominantColorForeground": "White",
    "dominantColorBackground": "Blue",
    "dominantColors": [
      "Blue",
      "White"
    ],
    "accentColor": "0750C4",
    "isBwImg": false,
    "isBWImg": false
  },
  "imageType": {
    "clipArtType": 0,
    "lineDrawingType": 0
  },
  "tags": [
    {
      "name": "water",
      "confidence": 0.9997772574424744
    },
    {
      "name": "outdoor",
      "confidence": 0.9996986389160156
    },
    {
      "name": "sky",
      "confidence": 0.9993903636932373
    },
    {
      "name": "beach",
      "confidence": 0.9672492146492004
    },
    {
      "name": "shore",
      "confidence": 0.963735044002533
    },
    {
      "name": "ocean",
      "confidence": 0.9035242199897766
    },
    {
      "name": "nature",
      "confidence": 0.896171510219574
    },
    {
      "name": "wave",
      "confidence": 0.4871264696121216
    },
    {
      "name": "sandy",
      "confidence": 0.14046534895896912
    },
    {
      "name": "voyage",
      "confidence": 0.055084559276120444
    },
    {
      "name": "landscape",
      "confidence": 0.02963506257691794
    },
    {
      "name": "sand",
      "confidence": 0.02806604807717514
    }
  ],
  "description": {
    "tags": [
      "water",
      "outdoor",
      "beach",
      "ocean",
      "nature",
      "man",
      "wave",
      "board",
      "shore",
      "surfing",
      "sand",
      "body",
      "standing",
      "umbrella",
      "sandy",
      "walking",
      "riding",
      "snow",
      "white",
      "blue"
    ],
    "captions": [
      {
        "text": "a sandy beach next to the ocean",
        "confidence": 0.9815995674986626
      }
    ]
  },
  "requestId": "26b96fb1-8b67-4bd6-b6ac-4e9621769a12",
  "metadata": {
    "width": 1200,
    "height": 800,
    "format": "Jpeg"
  }
}
The next step is to move from a raw web request and a JSON result to the C# SDK.
Adding Azure Computer Vision C# SDK to Episerver
This step is easy, it's just adding a Nuget Package to your Episerver CMS Project.
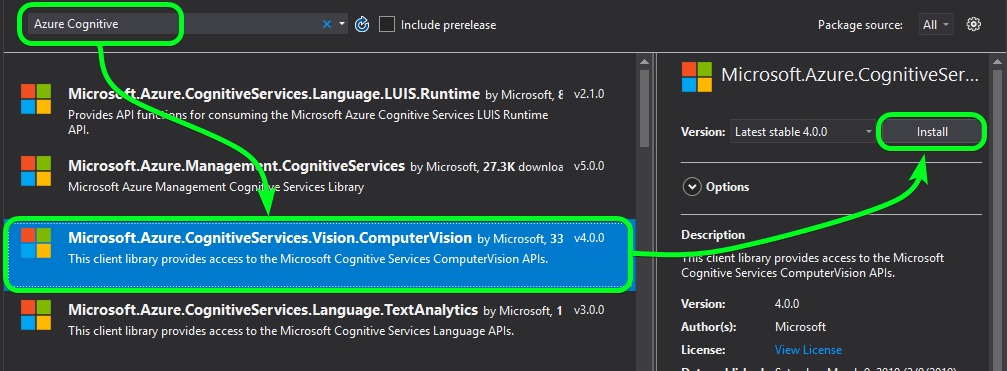
Search for Azure Cognitive > select Microsoft.Azure.CognitiveServices.Vision.ComputerVision
After the install, Build your solution to make sure everything is ok, then move on.
Working with the Computer Vision APIs
My example will use the Describing Images feature of the API. I will register an OnSavingContent event, pass the image stream to the API, and save the data returned from the Computer Vision API into read-only properties for later use.
Firstly, I need a new Class, which I called ImageFile, that inherits from ImageData to add some extra properties.
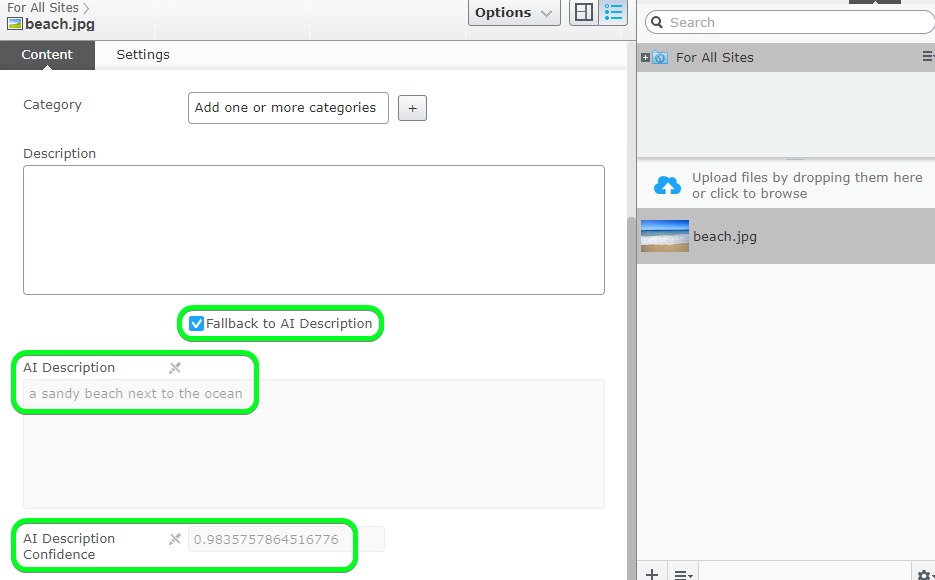
- Description - To be populated by a Human
- UseAiDescription - An editable boolean, initially set by AI, can be later set by a Human
- AiDescription - Read-only property to hold the image description text returned by the AI analysis
- AiDescriptionConfidence - Read-only property to hold the AI's confidence in its description
using EPiServer.Core;
using EPiServer.DataAbstraction;
using EPiServer.DataAnnotations;
using EPiServer.Framework.DataAnnotations;
using EPiServer.Web;
using System.ComponentModel.DataAnnotations;

namespace EpiserverDemo.Models.Media
{
    [ContentType(GUID = "0A89E464-56D4-449F-AEA8-2BF774AB8731")]
    [MediaDescriptor(ExtensionString = "jpg,jpeg,gif,bmp,png")]
    public class ImageFile : ImageData
    {
        [Display(
        Name = "Description",
            Description = "Manually populated Description of the Image",
            GroupName = SystemTabNames.Content,
            Order = 10)]
        [UIHint(UIHint.Textarea)]
        public virtual string Description { get; set; }

        [Display(
        Name = "Fallback to AI Description",
            Description = "If true, the AI Description will be used when Description is empty",
            GroupName = SystemTabNames.Content,
            Order = 10)]
        public virtual bool UseAiDescription { get; set; }

        [Display(
            Name = "AI Description",
            Description = "AI generated Description of the Image",
            GroupName = SystemTabNames.Content,
            Order = 20)]
        [Editable(false)]
        [UIHint(UIHint.Textarea)]
        public virtual string AiDescription { get; set; }

        [Display(
            Name = "AI Description Confidence",
            Description = "AI confidence rating for the generated Description",
            GroupName = SystemTabNames.Content,
            Order = 30)]
        [Editable(false)]
        public virtual double AiDescriptionConfidence { get; set; }
    }
}
Next, I needed to register the OnSavingContent event. You'll see for brevity I've hard-coded the Subscription Key (Key 1 copied from Azure) and the Computer Vision Endpoint (you can find a list of Endpoint URLs here based on the Location you selected in Azure).
The Computer Vision API can accept either a URL or Stream. I opted for the stream so that I didn't have to persist the Image to the database to get a URL.
You will also see a bit of logic to set the UseAiDescription property to true when Confidence is greater than or equal to 90%. I found the AI Description was often good when Confidence was above 85%.
using System.Collections.Generic;
using EpiserverDemo.Models.Media;
using EPiServer;
using EPiServer.Core;
using EPiServer.Framework;
using EPiServer.Framework.Initialization;
using EPiServer.ServiceLocation;
using Microsoft.Azure.CognitiveServices.Vision.ComputerVision;
using Microsoft.Azure.CognitiveServices.Vision.ComputerVision.Models;

namespace EpiserverDemo.Infrastructure
{
    [InitializableModule]
    [ModuleDependency(typeof(EPiServer.Web.InitializationModule))]
    public class ImageAiMetaDataInitialization : IInitializableModule
    {
        public void Initialize(InitializationEngine context)
        {
            var eventRegistry =
            ServiceLocator.Current.GetInstance<IContentEvents>();
            eventRegistry.SavingContent += OnSavingContent;
        }

        public void Preload(string[] parameters)
        {
        }

        private void OnSavingContent(object sender, ContentEventArgs e)
        {
            if (e.Content is ImageFile)
            {
                SetAiMetaData(e.Content as ImageFile);
            }
        }

        public void Uninitialize(InitializationEngine context)
        {
            var eventRegistry = ServiceLocator.Current.GetInstance<IContentEvents>();
            eventRegistry.SavingContent -= OnSavingContent;
        }

        public static void SetAiMetaData(ImageFile imageFile)
        {
            // get a stream of the image from binary data
            var stream = imageFile.BinaryData.OpenRead();

            // subscription key to use with Azure Computer Vision (found in Azure Portal)
            var subscriptionKey = "1774efe94d4e48ec96ad9d89d2ed4fc3";

            // specify the features to return, there's some cool stuff in here
            List<VisualFeatureTypes> features =
                new List<VisualFeatureTypes>()
                {
                VisualFeatureTypes.Categories, VisualFeatureTypes.Description,
                VisualFeatureTypes.Faces, VisualFeatureTypes.ImageType,
                VisualFeatureTypes.Tags, VisualFeatureTypes.Color,
                VisualFeatureTypes.Adult, VisualFeatureTypes.Objects
                };

            // make a Computer Vision client
            ComputerVisionClient computerVision = new ComputerVisionClient(
                new ApiKeyServiceClientCredentials(subscriptionKey),
                new System.Net.Http.DelegatingHandler[] { });

            // specify the Azure region endpoint (based on Computer Vision service location in Azure Portal)
            computerVision.Endpoint = "https://australiaeast.api.cognitive.microsoft.com";

            // analyse the image, return ImageAnalysis (sync for now, not await async)
            ImageAnalysis imageAnalysis = computerVision.AnalyzeImageInStreamAsync(stream, features).Result;

            // set Image AI Description
            var caption = imageAnalysis.Description.Captions[0];
            if (caption != null)
            {
                // set confidence first
                imageFile.AiDescriptionConfidence = caption.Confidence;

                // set the boolean based on Confidence. Only do this the first time AI Description populated
                if (string.IsNullOrEmpty(imageFile.AiDescription))
                {
                    // anything less that 90% confidence is often an inaccurate description
                    imageFile.UseAiDescription = (caption.Confidence >= 0.90);
                }

                // set the AI Description
                imageFile.AiDescription = caption.Text;
            }
        }
    }
}
The end result
When your code is ready, run the CMS and drag in an Image, I used this one.

This will trigger the OnSavingContent event and send your Image to the Computer Vision API for analysis, and finally populate your properties.
Here's a screencast (gif) of this whole process to give you a sense of the speed of the API (it's pretty fast considering I'm using the Free Pricing Tier);
https://i.imgur.com/sgBBFLg.gifv
Rendering the image
The last thing left to do is to render the image, the idea here is to;
- Use the Description property as alt text when populated (by a Human). Humans still describe Images better than Machines.
or - Use the AIDescription property as alt text if the Description property is empty and the UseAiDescription is true.
I won't add the View for this because it's pretty straight forward (and this blog is long enough) but let me know if you need it.
<img src="/globalassets/beach.jpg" alt="a sandy beach next to the ocean" >Wrapping it up
I hope I have inspired you to consider how can AI can be used to improve your CMS Editors experience and the quality of content.
I'm pretty impressed with the AI generated Description when its Confidence rating is high. But after using the APIs, I can admit that Humans are still far better at describing Images than Machines.
That said I do see a lot of potential, not just to assist the CMS Editor when they upload individual images, but especially by processing large amounts of images with a Scheduled Job.
Official Documentation References
- Azure Cognitive Services Computer Vision
https://docs.microsoft.com/en-us/azure/cognitive-services/computer-vision/home - Computer Vision API
https://westus.dev.cognitive.microsoft.com/docs/services/5adf991815e1060e6355ad44/operations/56f91f2e778daf14a499e1fa - Computer Vision C# SDK
https://docs.microsoft.com/en-us/azure/cognitive-services/computer-vision/quickstarts-sdk/csharp-analyze-sdk
Comments