
Posting Forms with Episerver MVC
In my previous post, I briefly discussed Episerver MVC support and included a few examples on how to implement it in a project. In this post, I’m going to talk about a functionality usually required by almost all web sites: forms. Episerver provides tools to editors to build forms (Episerver form add-on). But most of the time, specific forms that shouldn’t be modified by editors are desired. This post focuses on how to build these kinds of forms.
For the following example, we are going to implement a form as an Episerver block. This will allow you to drop the form in any page with a suitable container.
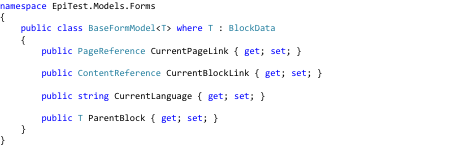
First of all, we need to create a base class for any Form models. This base class will contain basic data such as the current page link, current block link, current language and the form’s parent block. We’ll see later the use of these fields.
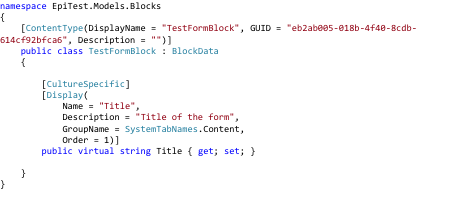
Before we create our form model, let’s first create the Block Type. For this example, it will only have one content field that will contain the form’s title.
Now we can create the form model. This will follow the same standard MVC patterns for forms, except that the model class will inherit from the Base Form Model class.
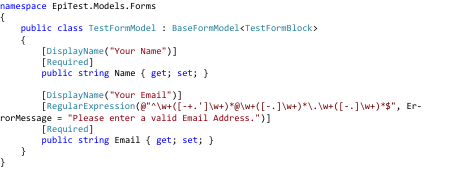
We are using a simple Form Model for this example, with required fields for Name and Email, and a Regular Expression validator for the Email field.
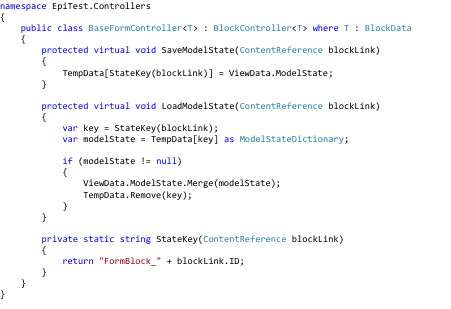
Next, we have to create the Form Controller. We’ll create a Base Form Controller with the methods we’ll reuse in any Form Controller. When we do a Post in a form, we’ll be losing the Episerver Context information. These methods will help keep the Episerver Context temporarily in the TempData store, and merge it back to the ViewData when returning to the Episerver page after the submission.
Now we can create our Form Controller. It will have a standard Index action that will display the form. Additionally, it will have a Submit action to handle the data submission from the form.
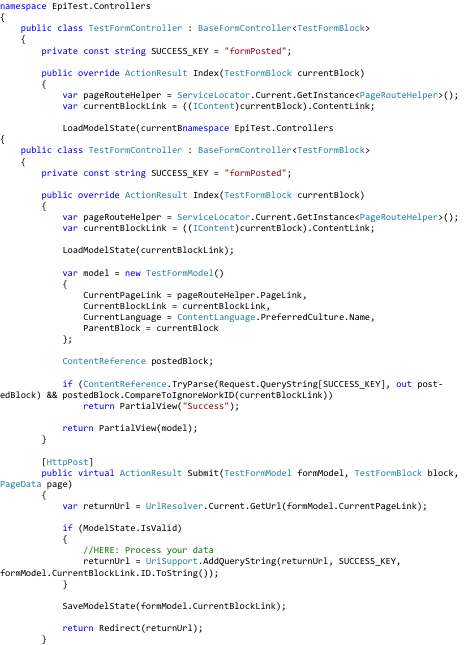
Let’s analyze the code of this controller. In the index action method, we get the current block content link in Episerver. The ID of the block will be used as part of the key in the TempData store. If the action was called after a form submission, the submit action would have stored the Episerver Context by using the SaveModelState() method. So the LoadModelState() method call would, at this point, merge the previous model state into the current one in order to maintain consistency and be able to show validation messages when something is not entered correctly by the user. When creating the form model, we store the current page link, the current block link, the language and the current block reference. In case this is a redirect from a posted form, if everything is valid, the partial view to display will be the one named “Success”. Otherwise, the default “index” view will be displayed.
For the submit action, it will first get the return URL for the page (it will come from the hidden fields in the view that will contain the page data). If the data entered by the user is valid (Model.IsValid), then it will process your data, and add to the Return URL the “form posted” flag with the Block ID. It will save the Model State into the TempData store (using the SaveModelState() call) and redirect the call to the return URL. When redirected to the return URL, it will process the block through the normal Index action and follow the steps described before.
We need 2 Views for this block. One contains the form presentation, and the other the “Thank you” message. Both will reside under \Views\TestForm. This is the main form view (Index.cshtml):
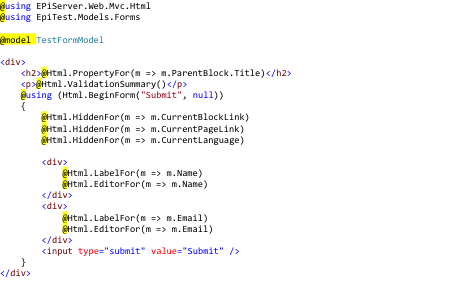
As you can see, the ParentBlock is referenced to get the title field from the block. Field properties are accessed directly from the model. You can also see that the BeginForm method references to the “Submit” action. Our Success page will be a very simple “Thank you” static page (Success.cshtml):

Before we deploy this to Episerver, make sure to include the following in your Global.asax code behind:
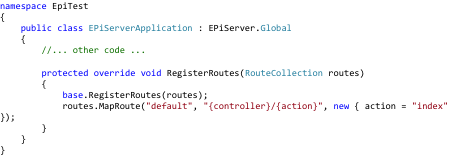
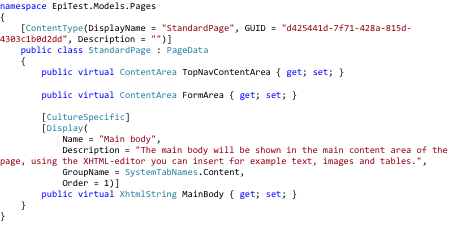
This will register the submit route for your forms. In the Page Type, make sure you have a property to contain the Form block (FormArea in this example):
Also, in your Views, make sure to register in your layout the section for the block:

And in the view that will contain the form:

Build and deploy your project. Register your new block, and use it in your page.
To get updated about on more of my posts, follow us on Twitter @Oshyn_Inc, or register for our email list at http://oshyn.com/resources/blog.html and check out our website as well!
Comments