A critical vulnerability was discovered in React Server Components (Next.js). Our systems remain protected but we advise to update packages to newest version. Learn More.
AI OnAI Off
A critical vulnerability was discovered in React Server Components (Next.js). Our systems remain protected but we advise to update packages to newest version. Learn More.
Product version: EPiServer Mail 5 R2
This document describes the necessary steps to install the EPiServer Mail package. Installing EPiServer Mail is completed through the EPiServer Deployment Center. All the EPiServer Mail installation steps are described in this document.
The following prerequisite exists for EPiServer Mail:
Upgrade to EPiServer Mail 5 R2 as follows:
When opening the EPiServer Deployment Center the different versions of EPiServer Mail currently installed on your machine will be listed. Select the task you want to perform under EPiServer Mail and click the Run button.
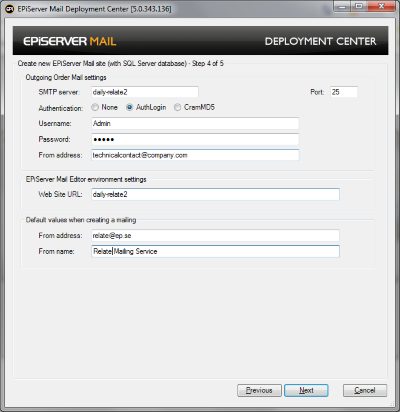
Choosing this option installs EPiServer Mail on a website with a SQL Server database. Target platform is EPiServer CMS 6 R2 with or without Community Module. This installs all components required for EPiServer Mail to work. As certain components are shared between EPiServer Mail and the Community Module, a new separate database with required tables and stored procedures will automatically be installed for EPiServer Mail if the Community Module is not already installed. Proceed the installation as follows:
Note! Preventing a Mailing to Be Caught in Spam Filters
If you have an SPF record in DNS for the domain of your sender e-mail address (From address), add include:_cluster1.episervermail.episerver.com to that record. For example, if no-reply @example.com is used as your sender e-mail address the DNS for example.com is subject for this addition.
If you do not yet have an SPF record it is still advisable to add one, allowing your regular SMTP servers as well as the include directive for the EPiServer Mail cluster. See http://www.openspf.net/ for further information.
Choose this option if you want to install EPiServer Community components. This installs components which allows EPiServerMail to interact with the EPiServer Community Module, and supports the following:
It installs no databases and makes no database changes.
Choose this option if you want to install EPiServer Mail without a database. The steps are identical to those described above in Installing EPiServer Mail on Existing Website except for step 2.
Target platform EPiServer - Load balanced environments, with a single database with tables and stored procedures which support the needs of EPiServer Mail.
This installs all components required for an EPiServerMail instance to work. By itself it installs no databases and makes no database changes.
Choose this option if you want to install a database for EPiServer Mail. The steps are identical to step 2, 3 and 7 described above in Installing EPiServer Mail on an Existing Website. This option could be a suitable option when using multiple instances of EPiServer Mail in a load balanced environment (without a suitably configured database). It installs the database, along with database tables and stored procedures which support the needs of one or more EPiServer Mail instances.
After installing EPiServer Mail 5 R2 refer to Activating EPiServer Mail for more information on how to activate an EPiServer Mail account.
Using a membership provider other than EPiServer.Common.Web.Authorization.MembershipProvider (such as SqlServerMembershipProvider in combination with EPiServer.Common.Web.Authorization.IntegrationMembershipProvider or EPiServer.Common.Web.Authorization.Multiplexing.IntegrationMultiplexingMembershipProvider)?
You need to create the groups MailAdmins / MailEditors in the EPiServer CMS Admin system in order to distribute appropriate access rights to the users that should have permission to use EPiServer Mail.
If you are using Windows Authentication, the EPiServerCommonIntegrationProvider cannot handle the syncing of users and roles.
This is due to the fact that the ValidateUser(username, password) method in EPiServerCommonIntegrationProvider will never be called, as the WindowsAuthentication ticket stores everything needed to validate the user. So the user will be authenticated, but not synchronized. The Identity of the request is set, but the Name of the Identity will not be available in the EPiServerCommon database.
To solve this, you can use a HTTP Module included in EPiServer Common. Add the following module to your list of HTTP Modules in web.config:
<add name="EPiServerCommonWindowsAuthenticationIntegration" type="EPiServer.Common.Web.Authorization.IntegrationHttpModule, EPiServer.Common.Web.Authorization" preCondition="managedHandler" />Note: If you are not uisng IIS 7, remember to remove the preCondition="managedHandler" attribute.
For Information regarding developing EPiServer Mail, see the EPiServer Mail Developers Guide.
Document last saved: