
Creating a custom editor in EPiServer 7
EPiServer 7 comes with a new user interface. It’s built as a client side application using JavaScript and is based on the client side framework Dojo. This affects editing of objects, for instance pages, and in EPiServer 7 we introduce a new way to create custom editors. Since the entire application is based on the Dojo framework, editing of content is done using the Dijit widget system which is Dojos widget system layered on top of the Dojo core.
It’s worth mentioning that we have a legacy editor that wraps any custom editors written for EPiServer 5-6 inside an iframe in a pop-up so any custom editors you have written will still work, although they require an additional click to edit.
General goals with the new editing system
Before going into the details of how to create a custom editor I would like to state few of the goals when developing the new object editing system:
- Make a generic editing system that can be reused for all EPiServer products and functions.It's currently only used when editing pages and shared blocks, but the functionality has been written to be able to edit any .NET object. In the future this can be used to edit dynamic content, visitor groups etc. so that you as a developer don't need to learn several ways of creating editors.
- Reduce the need to write custom properties. We have added support to use both standard .NET data annotation attributes as well as some custom attributes, making it possible to annotate the model for some cases instead of writing custom properties. See David Knipes excellent blog post about this.
- Add global registration for type editors. You should only need to define that your type has a specific editor once in the system. That editor would then be used everywhere we use the object editing system.
Connecting an editor to a type
In the EPiServer CMS 5-6 property system you connected a property editor by creating an instance of PropertyDataControl in your property. This instance was then responsible for creating controls both for displaying content on the site as well as creating an editor for the property.
In EPiServer 7 we have strived to separate the user interface logic and the rendering of content from the actual data types. To register an editor for a type you need to connect an editor descriptor to your property. There are several ways to do this. Either you annotate your property with your desired editor class in Dojo:
1: [ClientEditor(ClientEditingClass = "app.editors.EmailTextbox")]
2: public virtual string EmailAddress { get; set; }
You can also connect the property to an editor descriptor that is responsible for defining the editor class as well as additional settings for the editor:
1: [EditorDescriptor(EditorDescriptorType = typeof(ImageUrlEditorDescriptor))]
2: public virtual string Logotype2 { get; set; }
The two examples above will have effect on the property only. You can also register global editor descriptors and connect them to one or several types, effectively decoupling the UI-logic from the model:
1: [EditorDescriptorRegistration(TargetType = typeof(Email))]
2: public class PageListEditorDescriptor : EditorDescriptor
3: {
4: public PageListEditorDescriptor()
5: {
6: this.ClientEditingClass = "app.editors.EmailEditor";
7: }
8: }
Note: In the example above I connect the editor to my class Email which is just a regular .NET class used as my value type for my property. In the EPiServer 7 preview you need to connect your editor descriptor to your property type, for instance PropertyEmail and not the value type Email.
Creating the actual editor
The following example shows how an editor with e-mail address validation can look like.
1: define([
2: "dojo",
3: "dojo/_base/declare",
4: "dijit/_Widget",
5: "dijit/_TemplatedMixin"
6: ], function (
7: dojo,
8: declare,
9: _Widget,
10: _TemplatedMixin) {
11:
12: declare("app.editors.EmailTextbox", [_Widget, _TemplatedMixin], {
13:
14: // templateString: [protected] String
15: // A string that represents the default widget template.
16: templateString: '<div> \
17: <input type="email" data-dojo-attach-point="email" data-dojo-attach-event="onchange:_onChange" /> \
18: </div>',
19:
20: postCreate: function () {
21: // summary:
22: // Set the value to the textbox after the DOM fragment is created.
23: // tags:
24: // protected
25:
26: this.set('value', this.value);
27:
28: if (this.intermediateChanges) {
29: this.connect(this.email, 'onkeydown', this._onIntermediateChange);
30: this.connect(this.email, 'onkeyup', this._onIntermediateChange);
31: }
32: },
33:
34: focus: function () {
35: // summary:
36: // Put focus on this widget.
37: // tags:
38: // public
39:
40: dijit.focus(this.email);
41: },
42:
43: isValid: function () {
44: // summary:
45: // Indicates whether the current value is valid.
46: // tags:
47: // public
48:
49: var emailRegex = '[a-zA-Z0-9_.-]+@[a-zA-Z0-9-]+.[a-zA-Z0-9-.]+';
50: if (!this.required) {
51: emailRegex = '(' + emailRegex + ')?';
52: }
53: var regex = new RegExp('^' + emailRegex + '$');
54: return regex.test(this.value);
55: },
56:
57: onChange: function (value) {
58: // summary:
59: // Called when the value in the widget changes.
60: // tags:
61: // public callback
62: },
63:
64: _onIntermediateChange: function (event) {
65: // summary:
66: // Handles the textbox key press events event and populates this to the onChange method.
67: // tags:
68: // private
69:
70: if (this.intermediateChanges) {
71: this._set('value', event.target.value);
72: this.onChange(this.value);
73: }
74: },
75:
76: _onChange: function (event) {
77: // summary:
78: // Handles the textbox change event and populates this to the onChange method.
79: // tags:
80: // private
81:
82: this._set('value', event.target.value);
83: this.onChange(this.value);
84: },
85:
86: _setValueAttr: function (value) {
87: // summary:
88: // Sets the value of the widget to "value" and updates the value displayed in the textbox.
89: // tags:
90: // private
91:
92: this._set('value', value);
93: this.email.value = this.value || '';
94: }
95: });
96: });
EPiServer configures a default namespace in Dojo called “app” which is mapped to the folder “ClientResources\Scripts”. In this case we have placed the editor in the “ClientResources\Scripts\Editors” folder in the site so that we can load the script file whenever the class "app.editors.EmailTextbox" is required. The result will look like this:
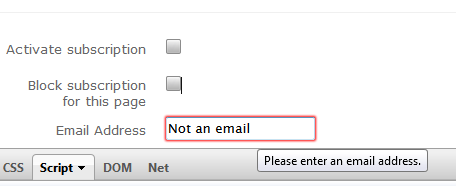
It’s also worth mentioning that the easiest way to accomplish email validation is to add a RegularExpression validaton attribute to your property which removes the need for a custom editor.
Comments