
Extending The Admin Interface in Optimizely CMS 12
In Optimizely CMS 11, developers could extend functionality with the Admin mode of the CMS by decorating standard MVC Controllers with the GuiPlugIn attribute. The pages would then be rended within an iFrame to preserve the admin menus. With the Optimizely CMS 12 .NET 5.0 preview, the GuiPlugIn attribute has been removed. According to the Breaking Changes in CMS 12 article, developers are instead advised to implement a Menu Provider instead. Extending the Admin mode of the CMS turned out to be relatively simple using this paradigmn.
First off, we are going to create a simple controller for our new Admin function. Note that there are no specific Optimizely references or decorators used within this controller, I have used a standard Microsoft Authorize attribute to ensure only the right users are able to use this functionality.
namespace OptimizelyTwelveTest.Features.CustomAdmin
{
    using Microsoft.AspNetCore.Authorization;
    using Microsoft.AspNetCore.Mvc;

    [Authorize(Roles = "CmsAdmin,WebAdmins,Administrators")]
    [Route("[controller]")]
    public class CustomAdminPageController : Controller
    {
        [Route("[action]")]
        public IActionResult Index()
        {
            return View();
        }
    }
}
Next we need to set up a new menu provider; I needed to both decorate the class with the [MenuProvider] attribute and ensure that the class implemented the IMenuProvider interface in order for Optimizely CMS to recognise and render these menus.
namespace OptimizelyTwelveTest.Features.CustomAdmin
{
    using System.Collections.Generic;
    using EPiServer.Shell.Navigation;

    [MenuProvider]
    public class CustomAdminMenuProvider : IMenuProvider
    {
        public IEnumerable<MenuItem> GetMenuItems()
        {
            var urlMenuItem1 = new UrlMenuItem("Custom Admin Page", "/global/cms/admin/csp", "/CustomAdminPage/Index");
            urlMenuItem1.IsAvailable = context => true;
            urlMenuItem1.SortIndex = 100;

            return new List<MenuItem>(1)
            {
                urlMenuItem1
            };
        }
    }
}
The Menu Provider can be used to return a collection of UrlMenuItem and SectionMenuItem objects. The UrlMenuItem takes three parameters, a display name, a path and a url while the SectionMenuItem only takes a display name and a path. The path defines where in the standard episerver menu that the link will be rendered. In the above case, I wanted the menu item to be rendered specifically within the admin section of the CMS. Both object types expose a method for IsAvailable that can be assigned a function that takes a HttpContext which can be used to customise under what circumstances the menu would be visible to the user. In the above case I have set this as always being visible.
When I navigate to the admin section of the CMS I can now clearly see my menu item:
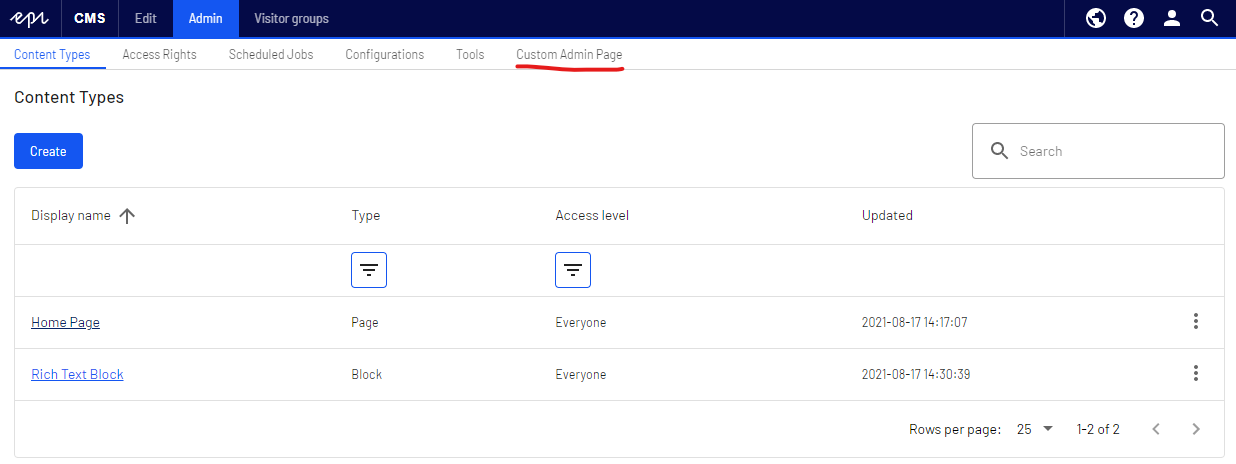
As previously stated, when you click on this menu item, your custom admin page is no longer rendered in an iFrame and instead you are sent directly to your custom admin page. This means that the user can no longer see the CMS Admin menu which can be a jarring experience for the user. Thankfully Optomizely CMS 12 also comes with a razor helper method that renders the admin menu when you call @Html.CreatePlatformNavigationMenu(), but you will need to tweak your styles to ensure that the menu does not show as an overlay on top of your custom admin page.
@using EPiServer.Framework.Web.Resources
@using EPiServer.Shell.Navigation

@{
    Layout = string.Empty;
}

<!DOCTYPE html>
<html lang="en">
<head>
    <title>Content Security Policy Management</title>

    <!-- Shell -->
    @ClientResources.RenderResources("ShellCore")

    <!-- LightTheme -->
    @ClientResources.RenderResources("ShellCoreLightTheme")
</head>
<body>
    @Html.CreatePlatformNavigationMenu()
    <div @Html.ApplyPlatformNavigation()>
        <h1>
            My Custom Admin Page
        </h1>
    </div>
</body>
</html>
This razor file will render as below, note that the menu rendering is smart enough to correctly highlight the Custom Admin Page menu item.

A Custom Admin Menu Section
Now lets say you want to create a new top level CMS menu section which in turn has two or more functions on the secondary menu like so:

You would need to define multiple UrlMenuItems within your MenuProvider. No hierarchy of objects is required here as Optimizely organises your menu items based on the path values that you provide for each menu item. I made the above work with the following MenuProvider; please note that I have not used a SectionMenuItem as the CMS user still needs something to happen when they click on the top menu for "Custom Admin Module".
namespace OptimizelyTwelveTest.Features.CustomAdmin
{
    using System.Collections.Generic;
    using EPiServer.Shell.Navigation;

    [MenuProvider]
    public class CustomAdminMenuProvider : IMenuProvider
    {
        public IEnumerable<MenuItem> GetMenuItems()
        {
            var adminModule = new UrlMenuItem("Custom Admin Module", "/global/cms/customadmin", "/CustomAdminPage/Index");
            adminModule.IsAvailable = context => true;
            adminModule.SortIndex = 100;
            var urlMenuItem1 = new UrlMenuItem("Custom Admin Page 1", "/global/cms/customadmin/pageone", "/CustomAdminPage/FunctionOne");
            urlMenuItem1.IsAvailable = context => true;
            urlMenuItem1.SortIndex = 100;
            var urlMenuItem2 = new UrlMenuItem("Custom Admin Page 2", "/global/cms/customadmin/pagetwo", "/CustomAdminPage/FunctionTwo");
            urlMenuItem2.IsAvailable = context => true;
            urlMenuItem2.SortIndex = 100;

            return new List<MenuItem>(3)
            {
                adminModule,
                urlMenuItem1,
                urlMenuItem2
            };
        }
    }
}
Please do let me know if this post has been useful to you and feel free to ask any questions :)
Comments